

Appearance
Test Fixture Maintenance
Test fixtures are critical components in the quality assurance process for PCBAs and other electronic assemblies. Like other sophisticated equipment, test fixtures require regular maintenance to perform their best. FixturFab's recommended maintenance periods are shown below.
Periodic Tasks
Check and Replace Test Probes
The spring-loaded test probes are subject to very different loads. A reliable signal transmission is only possible with fully functional test probes. Conditions for reliable contact are:
- no contamination on the plunger tip
- no excessive wear of the points of the plunger tip
- no scratches on the test probe's plunger shaft
- no metal chips, particles, or other contamination on the probe plate between the probes
- test probe is installed securely in the receptacle
- no height differences between test probes of the same type
- no bending of the test probe
- correct position of the respective test probe types
The spring-loaded test probes can be removed and installed quickly without the need additional wiring thanks to the receptacles. Specialized insertion and extract tools are available from INGUN to replace test probes.
Cleaning Test Probes
Test probes can be cleaned with commercially available, soft plastic or glass fibre brush or cleaning mats to remove severe contamination.
CAUTION
📢 High radial forces can lead to deformation of the probe. Ensure no side forces act on the test probes during the cleaning process!
- Note the plating wear
- Manual cleaning of the test probe plunger tips has a slightly abrasive effect on the outer plating
Repeated cleaning of tips can lead to removal of the conductive plating, which impairs the electrical performance. However, keeping plunger tips free from contamination will ultimately ensure reliable test results and improve the life expectancy of the probe.
Remove loosened dirt particles from the working area using vacuum or suction after cleaning
Cleaning the Test Fixture
Clean the test fixture with a soft cloth and a mild detergent. For cleaning, do not use cleaners with solvent or acidic content.
Grease/Lubricate the Test Fixture
Maintenance-free floating bearings and permanently lubricated deep groove bearings are installed in the test adapter to ensure that maintenance work is not required for these bearing components. The cam tracks of the rear bearing blocks are greased. Long-term testing under full loads show clearly that re-lubrication of these cam tracks is not required.
The gas pressure spring bearings (see picture below) should be serviced with a drop of sewing machine oil every 50,000 strokes.
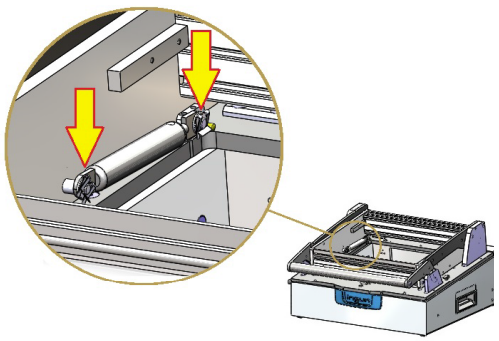
Ingun Fixture Base Maintenance
The recommended maintenance periods for Ingun Test Fixture Bases is shown in the image below.
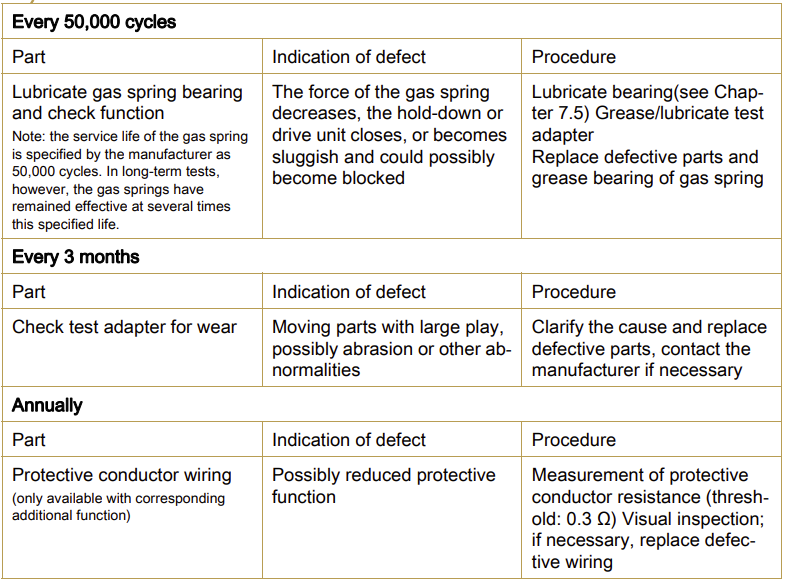
Ingun Spare Parts
Spare parts for all Ingun Test Fixture Bases and Cartridges can be found in Ingun Spare Parts Catalog.
For specific parts (probes, guide pins, etc.) to service your fixture, see the maintenance manual provided within the Design Package of the Test Fixture or System design.
Routine Care
Daily Operations
Before each shift:
- Visually inspect probe tips for damage or contamination.
- Verify the fixture opens and closes smoothly.
- Check that alignment pins are straight and undamaged.
During operation:
- Load boards gently — don't force a board into the nest.
- Ensure boards are properly seated before closing the fixture.
- Remove debris (solder balls, component fragments) promptly.
End of shift:
- Clean probe tips if testing flux-contaminated boards.
- Leave the fixture in the open position to prevent probe compression.
Probe Replacement
Probes wear over time. Spring fatigue, tip wear, and contamination eventually degrade contact reliability.
Replace probes when:
- Test results become inconsistent on known-good boards.
- Visual inspection shows bent or damaged tips.
- Contact resistance measurements exceed specifications.
- Probes no longer return to full extension.
Typical inspection intervals:
- Dev fixtures: probes may outlast the fixture lifetime (~1,000 cycles).
- Dev Pro fixtures: inspect probes at 5,000 cycles.
- Production fixtures: regular inspection schedule based on usage.
Cleaning Frequency
Board contamination — especially flux residue — transfers to probe tips and can cause intermittent contact failures. Clean based on the flux type:
- Flux-free or clean boards: monthly or as needed.
- No-clean flux boards: weekly or more frequently.
- Water-soluble flux boards: after each shift.
Troubleshooting
Intermittent Test Failures
Symptom: the same board passes sometimes and fails other times.
Possible causes: worn or contaminated probe tips, loose receptacle connections, inconsistent board seating, or damaged alignment features.
Diagnostic steps:
- Test a known-good board multiple times.
- Inspect the probes contacting the failing test points.
- Check board seating and alignment.
- Verify receptacle terminations.
Position-Dependent Failures
Symptom: failures correlate with specific probe positions.
Possible causes: individual probe damage or wear, probe plate damage, or TPCB trace damage.
Diagnostic steps:
- Identify the affected probe positions.
- Inspect those probes visually.
- Measure contact resistance.
- Check TPCB continuity if applicable.
Declining Pass Rates
Symptom: pass rate gradually decreases over time without board changes.
Possible causes: general probe wear, mechanical wear affecting alignment, or accumulating contamination.
Diagnostic steps:
- Compare current results to the baseline.
- Perform a thorough cleaning.
- Inspect high-use probes.
- Check mechanical alignment.
TPCB Considerations
Fixtures with TPCBs have additional maintenance considerations.
Connector care:
- Keep connectors clean and free of contamination.
- Check for bent pins before mating.
- Don't over-torque connector hardware.
Board inspection:
- Inspect for physical damage.
- Check for solder joint cracks on high-stress components.
- Verify connector mounting integrity.